Loading
Showing posts with label How-To. Show all posts

Seeds/Peer Increase by submitting torrent btReAnounceR


Increasing Torrent speed is fully depends on how much Seed And Peer your torrent file have.If your torrent file have very low seed and peer than its very hard to get a good downloading speed.So its good to have more Seed And Peer.
If your torrent have a zero seeds than your downloading will never get complete.
Than what to Do??

How-to: use Google Music from anywhere (yes, outside of the United States)

While browsing internet I found a cool stuff that i would like to share with you. It is about using Google Music Service Outside USA.Using Google Music service you can upload upto 20,000 songs and can listen them anywhere .. A video is also included to help you out in case you find some difficulties in following the steps..
www.hackerplus.in

Anonymous Surfing-Hide your real IP-Ultra surf


Ultra surf is a small free tool/utility that help you to bypass the firewall/gateway/router  restriction imposed by your ISP,at your workplace,schools or colleges. It also help to stay anonymous by hiding your real IP.


How to create Proxy chain | proxy chaining tutorial

A proxy is a server that acts as a gateway between your computer and your destination. Read my previous post on proxy server for detail. Proxy servers are used to stay anonymous over the internet. .
By using proxy server you can hide your real IP over the internet while surfing.

User---------->[proxy]----------->[website]

the website will get the IP of the proxy not yours.

Proxy Chaining: Proxy chaining is the use of more than 1 proxy servers to stay anonymous. You can use as many proxy servers as you can or want. The more you have, the more anonymous you will be. This can be shown like this..


User---------->[proxy1]---------->[proxy2]---------->[proxy3]---------->.......---------->[proxyN]---------->[website]

the user first connect to Proxy1. After connecting to Proxy1, Now the user will connect to Proxy2, then, the user will connect to Proxy3, then the user will connect to Proxy4, and thus using N proxies, the user will then connect to website he want to use.

You can use as many proxies u want but you can never be 100% anonymous.

How to create proxy chaining


Blogger Sitemap Generator Guide- Increases Your Traffic

One thing that you can do to make your blog indexed fast by search engines such as Google, Yahoo, or Bing is by sending the sitemap address of your blog.

The following are the way to use Blogger Sitemap Generator :

  1. Please visit http://digitalinspiration.com/tools/blogger/sitemap/index.php
  2. Enter your blog address into the empty field available, do not forget to write your complete blog address including the http:// and ends with / (slash) (e.g. http://www.blogspottutorial.com/ ), and then click the Create Blogger Sitemap button. 

Google secrets - Some Cool Gooooogle

Method 1


www.google.com
put this string in google search:
"parent directory " /appz/ -xxx -html -htm -php -shtml -opendivx -md5 -md5sums
"parent directory " DVDRip -xxx -html -htm -php -shtml -opendivx -md5 -md5sums
"parent directory "Xvid -xxx -html -htm -php -shtml -opendivx -md5 -md5sums
"parent directory " Gamez -xxx -html -htm -php -shtml -opendivx -md5 -md5sums
"parent directory " MP3 -xxx -ht
ml -htm -php -shtml -opendivx -md5 -md5sums
"parent directory " Name of Singer or album -xxx -html -htm -php -shtml -opendivx -md5 -md5sums
Notice that i am only changing the word after the parent directory, change it to what you want and you will get a lot of stuff.
voila!

Method 2

www.google.com
put this string in google search:
?intitle:index.of? mp3
You only need add the name of the song/artist/singer.

Example: ?intitle:index.of? mp3 jackson

Solution to Battery plugged in but not charging


Today As usual I was using my laptop when I saw something typical happening with Battery status. Even though the power was plugged in, it showed ” plugged in, not charging“.

So I started doing a bit of googling on the web and finally found the solution here.


  1. Turn off laptop.
  2. Unplug AC power.
  3. Remove battery.
  4. Replace AC power.
  5. Turn on laptop, allow OS to boot.
  6. Once logged in to the machine, perform a normal shut down.
  7. Unplug AC power.
  8. Replace battery.
  9. Replace AC power.
  10. Turn on laptop, allow OS to boot. The battery should once again be charging as normal.

Login With Multiple Accounts Within One Browser

Some time we require to Login to our different accounts of Facebook, Gmail, Yahoo,  etc without Signing Out from first one. If you are in such situation than you can use a Firefox Addon called Multifox which allows Firefox to connect to websites using different user names Simultaneously!. Isn't that great. For that you require a Mozilla Firefox browser which you can get freely from Firefox Website

For example, if you have multiple Gmail accounts, you can open them all at the same time. Each Firefox window, managed by Multifox, accesses an account without interfering each other. Just follow below step to get Multifox Addon on your Firefox.

1.Go to http://br.mozdev.org/multifox/
And click on Install (Install for your Firefox Ver 3.6 or 4)


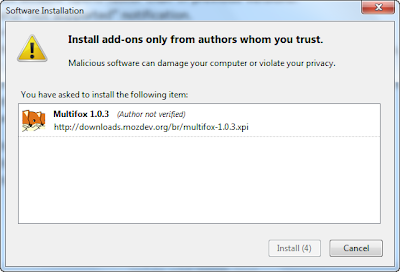
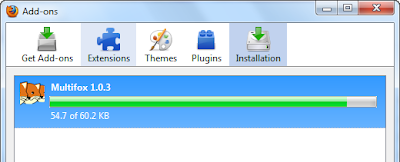
2.It may give you a pop up to allow it. Just click allow and you will see a install window like below. Click On Install.


3.After Installing you will be asked to Restart your Firefox. Just save your work and Restart.

4. After restarting your browser you can right click on Tab menu and then select Open in a new Identity profile

How To Prevent From Hackers

I Post this Topic to Protect people From HAcker.Hope you like it.Please give me your Comment.


How to Protect from Hacking or atleast avoid it?


1. Download Panda USB Vaccine which disable the Autorun.inf File.By Autorun.inf file,Any Program can executed when a new USB Device is Plugged in.For Download Go to-http://www.pandasecurity.com/homeusers/downloads/usbvaccine/


2. Intall a Good Firewall as it protect the unauthorized access of Internet by Hacker,Keylogger.I suggest you to install Zone Alarm.Download It from-http://www.zonealarm.com/security/en-us/anti-virus-spyware-free-download.htm


3. If file is Suspicious,Then run it in sand boxie.Sandboxie runs your programs in an isolated space ,which prevents them from making permanent changes to other programs by Virus,Program and data in your computer.You can also run Virus in SandBoxie which does not harm your computer.Download It from 
here- http://www.sandboxie.com/index.php?DownloadSandboxie.


4.Antiloggers are programs which are specially used for detecting the presence of keylogger, One of the popular antilogger is a zemana antilogger which claims to detect almost any keylogger .Download 
It from here- http://www.zemana.com/download.aspx


5. If someone installed stealth FUD Keylogger,then it is very hard to Detect it.So install Key Scrambler.Using advanced encryption algorithms, KeyScrambler encrypts your keystrokes deep in the kernel, as soon as they enter the computer.When the encrypted keystrokes finally arrive at the intended application, the decryption component of KeyScrambler goes to work, and you see exactly the keys you've typed.Download It from here-
http://www.qfxsoftware.com/download.htm


6. Install a Good Spyware as it protect your computer against spyware threats.Spyware cease is one of my most favorite antispywares. The reason why I like is that it has a very user-friendly interface and it can protect your computer against 99% spyware threats. So if you are looking for a good antispyware software I recommend Spyware cease.Download It form 
here- http://www.spywarecease.com/download.php


7. Install a Antivirus.I recommended You use Kaspersky and Norton.


8. Try to Turn off Javascript.


9. Never Download file from Hacking,Warez sites because file is binded with Keylogger,Virus.


10. If you Want more than Sandboxie,Then use Virtual Machine Software.It creates a temporary new operating in which you can do anything.You can compare Sandboxe and Virtual Machines to Proxy and VPN.


11. Never Use Proxy because some proxies store your Username,Password.Always use Good Free VPN. Some 
of Good VPN are 
a.http://www.cyberghostvpn.com/files/download.php
b.http://www.macrovpn.com/
c.https://www.ultravpn.fr/


12. Always use Logout in any website,Forum instead of directly closing the Website.


13. Don't Click on Malcious link as it can copy Cookies,Intsall RAT by using Java applet.


14. Install Deep Freeze.Faronics Deep Freeze makes computer configurations indestructible and prevents against unwanted workstation changes—regardless of whether they are accidental or malicious.Download It from here-http://www.faronics.com/en/DownloadEvaluationEditions.aspx


15. There Is no Program/Software which hack Gmail,Facebbok,Twiiter,Yahoo etc. Account.Don't Believe on them.


16. If File is small,Do online Virus Checking at
a.http://novirusthanks.org
b. http://onlinescan.avast.com/
c. http://www.virustotal.com/


17. Don't Use Public Wi-Fi Hotspot.Connect it through VPN.


Note: Although I tried to keep it up to date but there may be a better option available. So don't forget to google.

How To: Install Windows 7/Vista From USB Drive [Detailed 100% Working Guide]

How To: Install Windows 7/Vista From USB Drive [Detailed 100% Working Guide]


This guide works 100% for Vista & Windows 7 unlike most of the guides out there. I have seen many sites/blogs that have “Install Vista from USB guide” but either with incomplete steps or not working guide. I have also seen some guides that don’t’ use proper commands in this guide. After spending many hours I have come up with this 100% working guide.


I just did this method on one of my friends machine and installed the new Windows 7 BETA. The main advantage is that by using USB drive you will be able to install Windows 7/Vista in just 15 minutes. You can also use this bootable USB drive on friend’s computer who doesn’t have a DVD optical drive.

The method is very simple and you can use without any hassles. Needless to say that your motherboard should support USB Boot feature to make use of the bootable USB drive.

Requirements:

*USB Flash Drive (Minimum 4GB)

*Windows 7 or Vista installation files.

Follow the below steps to create bootable Windows 7
/Vista USB drive using which you can install Windows 7/Vista easily.

1. Plug-in your USB flash drive to USB port and move all the contents from USB drive to a safe location on your system.

2. Open Command Prompt with admin rights. Use any of the below methods to open Command Prompt with admin rights.

*Type cmd in Start menu search box and hit Ctrl+ Shift+ Enter.

Or

*Go to Start menu > All programs > Accessories, right click on Command Prompt and select Run as administrator.

3. You need to know about the USB drive a little bit. Type in the following commands in the command prompt:

First type DISKPART and hit enter to see the below message.


Next type LIST DISK command and note down the Disk number (ex: Disk 1) of your USB flash drive. In the below screenshot my Flash Drive Disk no is Disk 1.

4. Next type all the below commands one by one. Here I assume that your disk drive no is “Disk 1”.If you have Disk 2 as your USB flash drive then use Disk 2.Refer the above step to confirm it.

So below are the commands you need to type and execute one by one:

SELECT DISK 1

CLEAN

CREATE PARTITION PRIMARY

SELECT PARTITION 1

ACTIVE

FORMAT FS=NTFS

(Format process may take few seconds)

ASSIGN

EXIT

Don’t close the command prompt as we need to execute one more command at the next step. Just minimize it.


5. Next insert your Windows7/Vista DVD into the optical drive and check the drive letter of the DVD drive. In this guide I will assume that your DVD drive letter is “D” and USB drive letter is “H” (open my computer to know about it).

6. Maximize the minimized Command Prompt in the 4th step.Type the following command now:

D: CD BOOT and hit enter.Where “D” is your DVD drive letter.

CD BOOT and hit enter to see the below message.

7. Type another command given below to update the USB drive with BOOTMGR compatible code.

BOOTSECT.EXE /NT60 H:


Where “H” is your USB drive letter. Once you enter the above command you will see the below message.

8. Copy your Windows 7/Vista DVD contents to the USB flash drive.

9. Your USB drive is ready to boot and install Windows 7/Vista. Only thing you need to change the boot priority at the BIOS to USB from the HDD or CD ROM drive. I won’t explain it as it’s just the matter the changing the boot priority or enabling the USB boot option in the BIOS.

Note: If you are not able to boot after following this guide means you haven’t set the BIOS priority to USB. If you got any problem in following this guide feel free to ask questions by leaving comment.


Taken From: Mobiplanet4m

Windows 7 themes

Window 7 like windows previous release supports msstyler for using themes but the theme has to bee digitaly signed by microsoft otherwise its won't work and since there are very handgul number of themes which are signed by microsoft there is need to patch the system files. This job which require to add some code in window xp is not so easy in window 7. In window 7 it is require to patch file spread accross multiple location which is not possible for common user. So for rescue their are patcher available and one of which i used is "Universal theme patcher" It patches three sysytem files:
"themeservice.dll;themeui.dll;uxtheme.dll". So enjoy.
To download just google it
Note: Patching core system files may lead to sysytem instability used on your risk

How to login as administrator in Windows 7?

This is a tutorial that will help you to login as a administrator in Windows 7.

In order to login as a administrator, you will first have to activate the “hidden” administrator account.


Activating the hidden admin account!
Goto “Start” and enter “cmd.exe” into the search field. (Cmd stands for Command)

Hold CTRL + Shift and hit Enter to run cmd.exe with administrator privileges.

Enter the following line into the command line prompt:
net user administrator /active:yes


Then Logoff and You will notice that there is a new account on your login screen.

Related Posts Plugin for WordPress, Blogger...